Unreal Engine Fisheye Rendering
Contributors

Funding

Versions
This guide is for 5.3.2 and newer versions of Unreal Engine. This version saw major changes to camera setup, deprecating old behavior and makes parts of the old guide obsolete. For older versions please follow the link.
Download the Unreal Engine plugin
- Unreal Engine 5.3.2 | 2024-02-13
About
This page is a step by step instruction on how to use the Fisheye Render Setup plugin for Unreal Engine to render frames that can be stitched into a fisheye format using our custom stitcher. The plugin allows you take a Camera Sequence in Unreal and render out modified Camera Angles of it, creating Left, Right, Top and Bottom frames in stereo that can then be stitched into Fisheye frames.
Using Unreal Engine with its real time capabilities to render can speed up production time of movies immensely, as dome movie render times can be reduced from weeks and months to hours and days.
Making a New Project
- Create a new project. You can use any of the premade templates that suit your project the best, but for this tutorial we will use a blank project.
- Make sure you have the following settings in your project. It should be the default settings, with the addition of turning on Raytracing
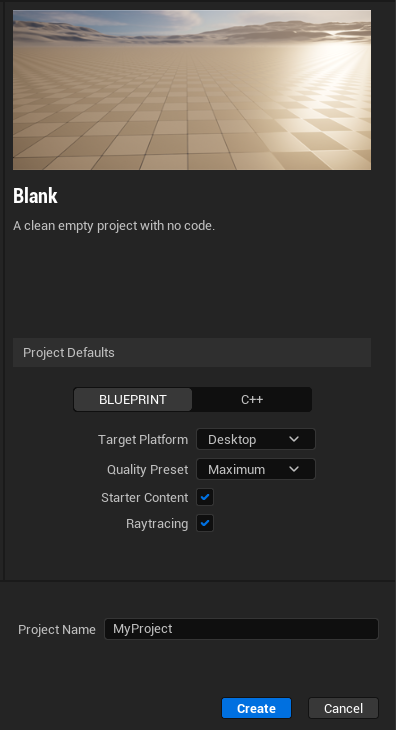
Project Settings
- If your computer supports it, turn on Use Hardware Ray Tracing when available
- Set Ray Lighting Mode to Hit Lighting for reflections
Installing the Unreal Engine Plugin
- Download the plugin matching your Unreal Engine version
- Add the
FisheyeRenderSetupfolder to your projects Plugins folder. If you don’t have a Plugins folder you can add one. - Start your project and check the Plugins browser to see that the plugin is installed
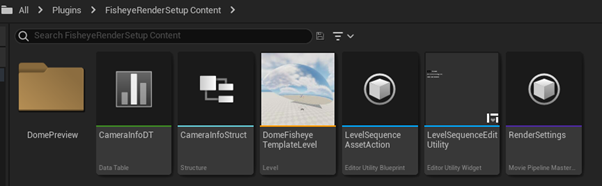
- Open the Settings menu in your Content Browser and enable Show Plugin Content
- You can now find the
FisheyeRenderSetupcontent folder under All > Plugins - Right click LevelSequenceAssetAction and select Run Editor Utility Blueprint to ensure that it can be run further down the line
Level Setup
The following steps assumes that you have a blank scene with nothing in it. You can copy the DomeFisheyeTemplateLevel and use it as a starting point if you want to skip the following setup steps in Light Setup, Post Process Volume and Camera Actor. Alternatively, you could copy and paste the relevant actors into another level.
Lighting
- Go to the Window tab and Open Environment Light Mixer
- Press every button EXCEPT Atmospheric Light 1
- In the outliner, select the Skylight and turn on the Real Time Capture checkbox

Post Process Volume
- Add a Post Process Volume to your scene
- Check Infinite Extent (Unbound) so that the volume affects the whole scene

-
Change the reflection method to Standalone Ray Traced. This sets the reflection method to Hardware instead of software. Lumen is limited in how good reflections it can produce, especially on highly reflective materials. Lumen cheats by using Screen space reflections, but this doesn't work for fisheye renders as objects visible in one camera won't reflect in the others. With Hardware Ray Tracing we get around this problem, with the trade-off being higher rendering time. You can omit this step if you don't have any issues with reflections.
- Tweak Max Roughness to set how reflective a material has to be to get a reflection. Lower values include more objects.
- Increase Max Bounces to get a more correct reflection. This is costly, so don't go higher than you need.
- Increase Samples Per Pixels if your reflective surfaces seem grainy. Higher values will be more costly, as it will cast a ray through each pixel for each level.
-
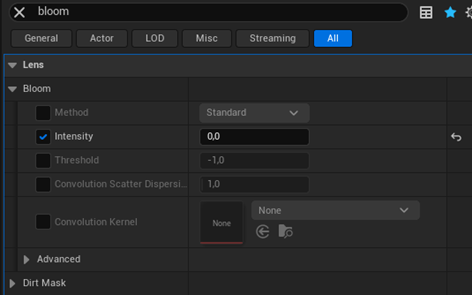
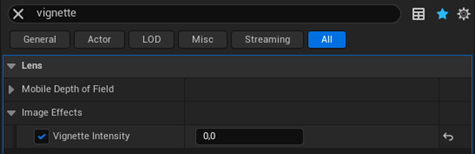
You need to turn off some screen space effects as they don't work with fisheye stitching. If you have them turned on you will see borders between the stitched images.
- Set Bloom > Intensity to 0.0
- Set Image Effects > Vignette Intensity to 0.0
-
Unreal Engine has Auto Exposure turned on by default (you can also edit this in project settings). We want to turn this off as the exposure should not change between camera angles.
- Set Exposure > Metering Mode to Manual
- _Exposure > Turn Apply Physical Camera Exposure Off
- Tweak Exposure > Exposure Compensation to match the lighting you want in your scene
Camera Actor
Add a CameraActor (not CineCameraActor). Set the cameras Aspect Ratio to 1.0 and Post Process Blend Weight to 0.0
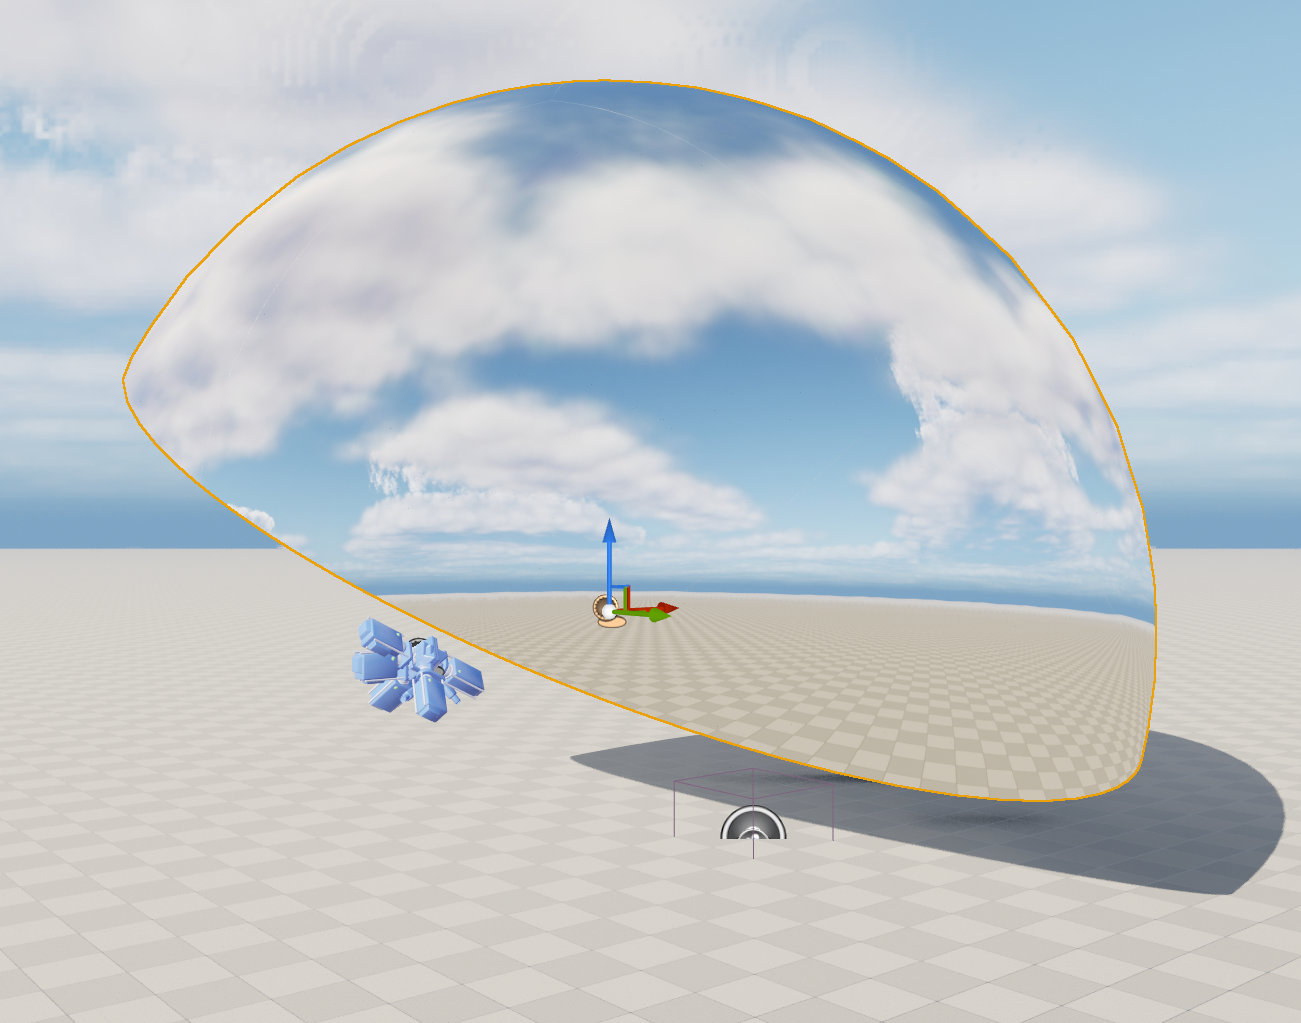
Dome Preview
If you want you can also add a Dome Preview, to check how the fisheye view would look in a dome
- Go to All > Plugins > FisheyeRenderSetup Content > DomePreview
- Add a
DomePreviewSphere. You can set the dome to be either 180° or 165°, as well as set the dome tilt angle. At VisC the dome is 165° but the actual fisheye video should be 180°, as it is skewed to fit at a later stage. So for that purpose the preview should be set to 180°. - Add a
DomePreviewCamera. Attach it to theCameraActorand make sure the transforms are at default values. - Select the
DomePreviewCameraand press the Update Camera button in the Details menu. The camera view will now be drawn to theDomePreviewSphere - You can also check Capture Every Frame to have the camera always update but beware of the performance hit
Creating Sequences
To render out a scene, you need to create sequences that you can render out using the Movie Render Queue. The goal is to create a base sequence, and then create duplicates with the adjusted camera angles needed to render out the images we use for stitching together fisheye images.
- Create a new Level Sequence and open it.
- Select the
CameraActorfrom your rig and drag it into Sequence. You should see it be added as a new track, along with a Camera Cuts track. You can also manually create a Camera Cuts track and add your camera to it.

- If the camera gets too close to an object, the stereo effect will break as the brain can't parse what's going on. Bascially, if the dome surface is 7 meters away, you get a good stereo effect of an object that is 5 meters away. But if the object is 50 cm away, the stereo will be too intense and it will make you nauseous. If this is the case, you might want to adjust the distance between your eyes instead, effectively scaling the viewer. If you scale down the viewer to 1/10th, 50 cm becomes 5 meters in the eyes of the viewer. To achive this in Sequencer, you can keyframe the scale of
CameraActor. This means that the relative location of the camera component inCameraActorwill be scaled, so the normal "eye distance" of 3.5 cm will be 0.35 at 1/10th scale etc.
Creating Camera Angle Duplicates
Once you have a base Level Sequence, you want to create duplicates for each camera angle, as well as eye of you are rendering for stereo. To do this we use scripted functionality from the plugin that adjusts the camera component rotation and relative location offset.
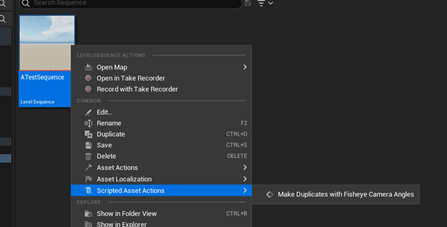
- Right click your Level Sequence and select Scripted Asset Action > Make Duplicates with Fisheye Camera Angles
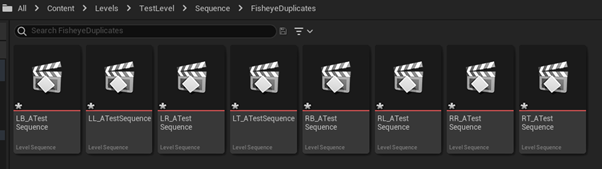
- Now you should see a new folder appearing, containing the new duplicates. The prefix indicates which eye position and camera angle each Sequence contains. For example,
LB_Sequenceis Left eye, Bottom camera angle.
- If you want to adjust your sequence, make the adjustments in the base Sequence and then redo the duplication step. It should override the old duplicates.
Render with Movie Render Queue
It is now time to render your sequences. This is done with the Movie Render Queue
- Open Window > Cinematics > Movie Render Queue
- Drag one of the sequences from the Content Browser into the Movie Render Queue
- Open the settings and press Load/Save Pre-set. Select the
RenderSettingspre-set which is part of the plugin. Press Accept to apply the new settings - You can now drag in the rest of the sequences, and
RenderSettingsshould apply to all of them

-
If you want to change something in
RenderSettings, you can either change it locally for one sequence in the Movie Render Queue window or change it globally by saving theRenderSettingsfile in the top right corner, or by editing it directly in the plugin folder and saving it there. If changes have only been made locally, it is marked with a *, e.g. RenderSettings*.- In the Output tab you can control various settings, such as where the frames will be saved and under what name, the resolution of your frames and if you want to render a custom set of frames.
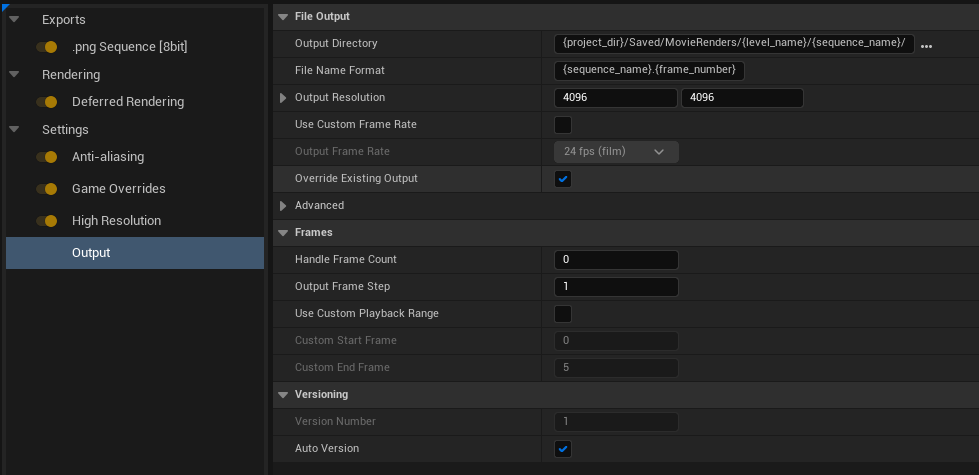
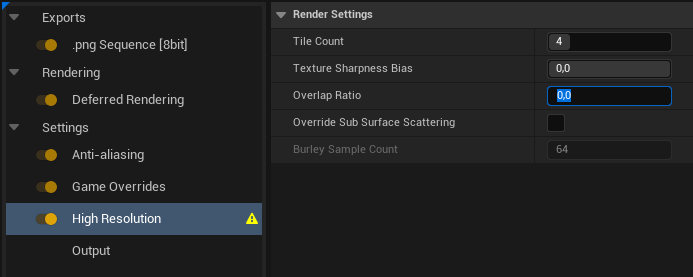
- If your desired render resolution is higher than what your computer can manage, you can use the settings in the High Resolution tab to set a tile count which will split each frame into smaller tiles. For example, if you set the tile count to 4, it will split a 4096x4096 image into 4x4 1028x1028 images, which can be rendered on a far less powerful computer. However, if you can manage high resolutions right away it is most likely quicker to render.
- Should you choose to use High Resolution, you will also need to adjust settings in Anti-Aliasing. Set the anti-aliasing method to none, as it is not supported for tiled rendering. Instead, you use Temporal Samples to remove any aliasing issues. This creates a number of subframes based on your TS count, captured with a small time difference, which can be averaged to produce a more clean end frame. Increase the count as you see fit to remove any artifacts that may occur, at the cost of higher render times.
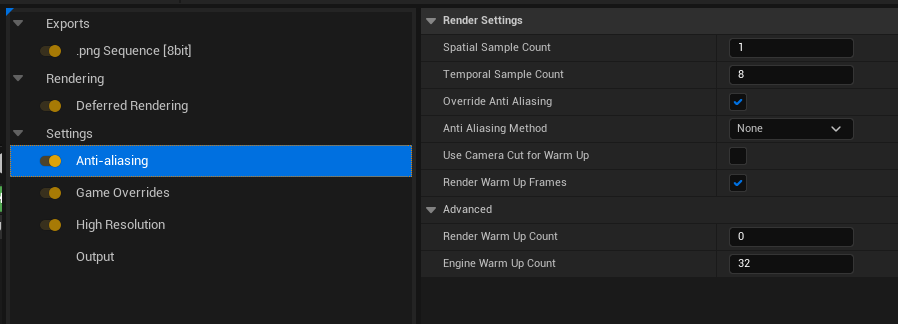
Be aware that the use of Anti-Alising can cause GPU crashes when used together with Hardware Ray Tracing. This behavior has been observed in Unreal Engine 5.1/5.2. The crash is caused by having a Render Warm Up Count bigger then 0. When using this setting, the engine tries to submit n frames to the VRAM, without ticking the engine between each frame. This will cause a crash as the VRAM memory simply runs out. The correct settings is instead:
- Render Warm Up Frames
- Render Warm Up Count = 0
- Render Warm Up Frames = 32 (This seems like a good number but you can change it as needed)
Niagara Systems
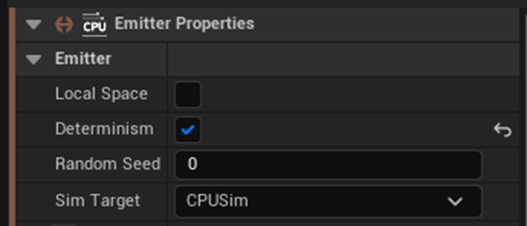
As the rendering basically restarts for each camera angle, the scene will simulate again for each render. This means that things like Niagara Particle systems can't have a random factor, as it needs to produce the same result for each render.
- In your Niagara Emitter/System, make sure that Emitter > Determinism is checked to ensure the same result each render
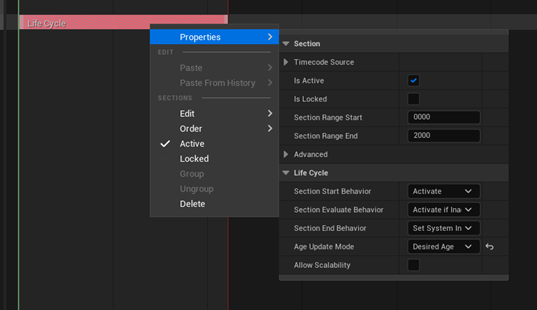
- We can control the Niagara System by adding it to our Sequence. Add a Niagara Component track and add a System Life Cycle track to it.

- Right click the Life Cycle track and set Properties > Age Update Mode to Desired Age. This makes the sequencer control the life span of the particle system, allowing you to scrub though the simulation with a determined state for each frame.
Making Procedural Materials Deterministic
Some Materials changes with time and other variables that might vary between runs. As this might cause issues with rendering multiple times, we need a deterministic solution. Therefore, you might want to use a Global Material Collection to control a material with the sequencer.
- Create a Materials > Global Parameter Collection and open it up
- Add any values that you might want to change globally. They can be both scalar and vector parameters
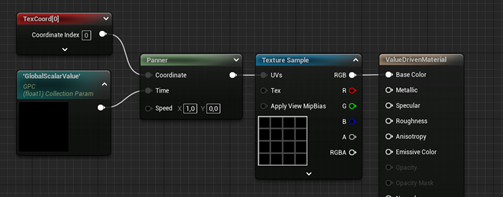
- Drag your GPC into a material and select your parameter of choice from the dropdown in the Details menu
- Plug the value in as needed, e.g. as the Time input for a Panner node
- Drag your GPC into a sequencer and add the parameter you want to control as a track.
- Set keyframes for the parameter and watch as your material changes when playing the sequence.

Raytraced Refraction
Transparent materials with refraction, such as glass, can cause issues when rendering fisheye frames as the default refraction seems to be view dependent. This is solved by changing the translucency type in the Post Process Volume from Raster to Ray Tracing. You then have to set up the transparent material to utilize ray tracing:
- Blend Mode - Translucent
- Two Sided
- Lighting Mode - Forward Shading
- Refraction Mode - Index Of Refraction
Common issues and bugs
This section is a collection of known issues that may occur based on user error, which can be hard to debug.
Sequence actor placed in level causes fighting over camera control
If your camera render is not behaving as expected, it might be because the sequence that you are trying to render is also placed in the level as an actor. This is intended use of sequences in some instances, as it allows you to keyframe movement of objects and play them on demand in a game. However, if the sequence placed in the level is also the one you are trying to render this will cause issues, since both sequences will be fighting for the control of the camera. Of course, the same issue will occur with two different sequences that are trying to control the same camera actor. To debug this issue, search the level outliner for any LevelSequence that might cause issues.
Lighting descrepencies between cameras
Sometimes in specific light conditions you mights see that the lighting of the scene doesn't match perfectly between cameras. It is still unclear as to why this occurs. A hack to hide this issue is to use the High Resolution tiling with an Overlap ratio, which seems to minimize the visual issues.