Unreal
Contributors

Funding

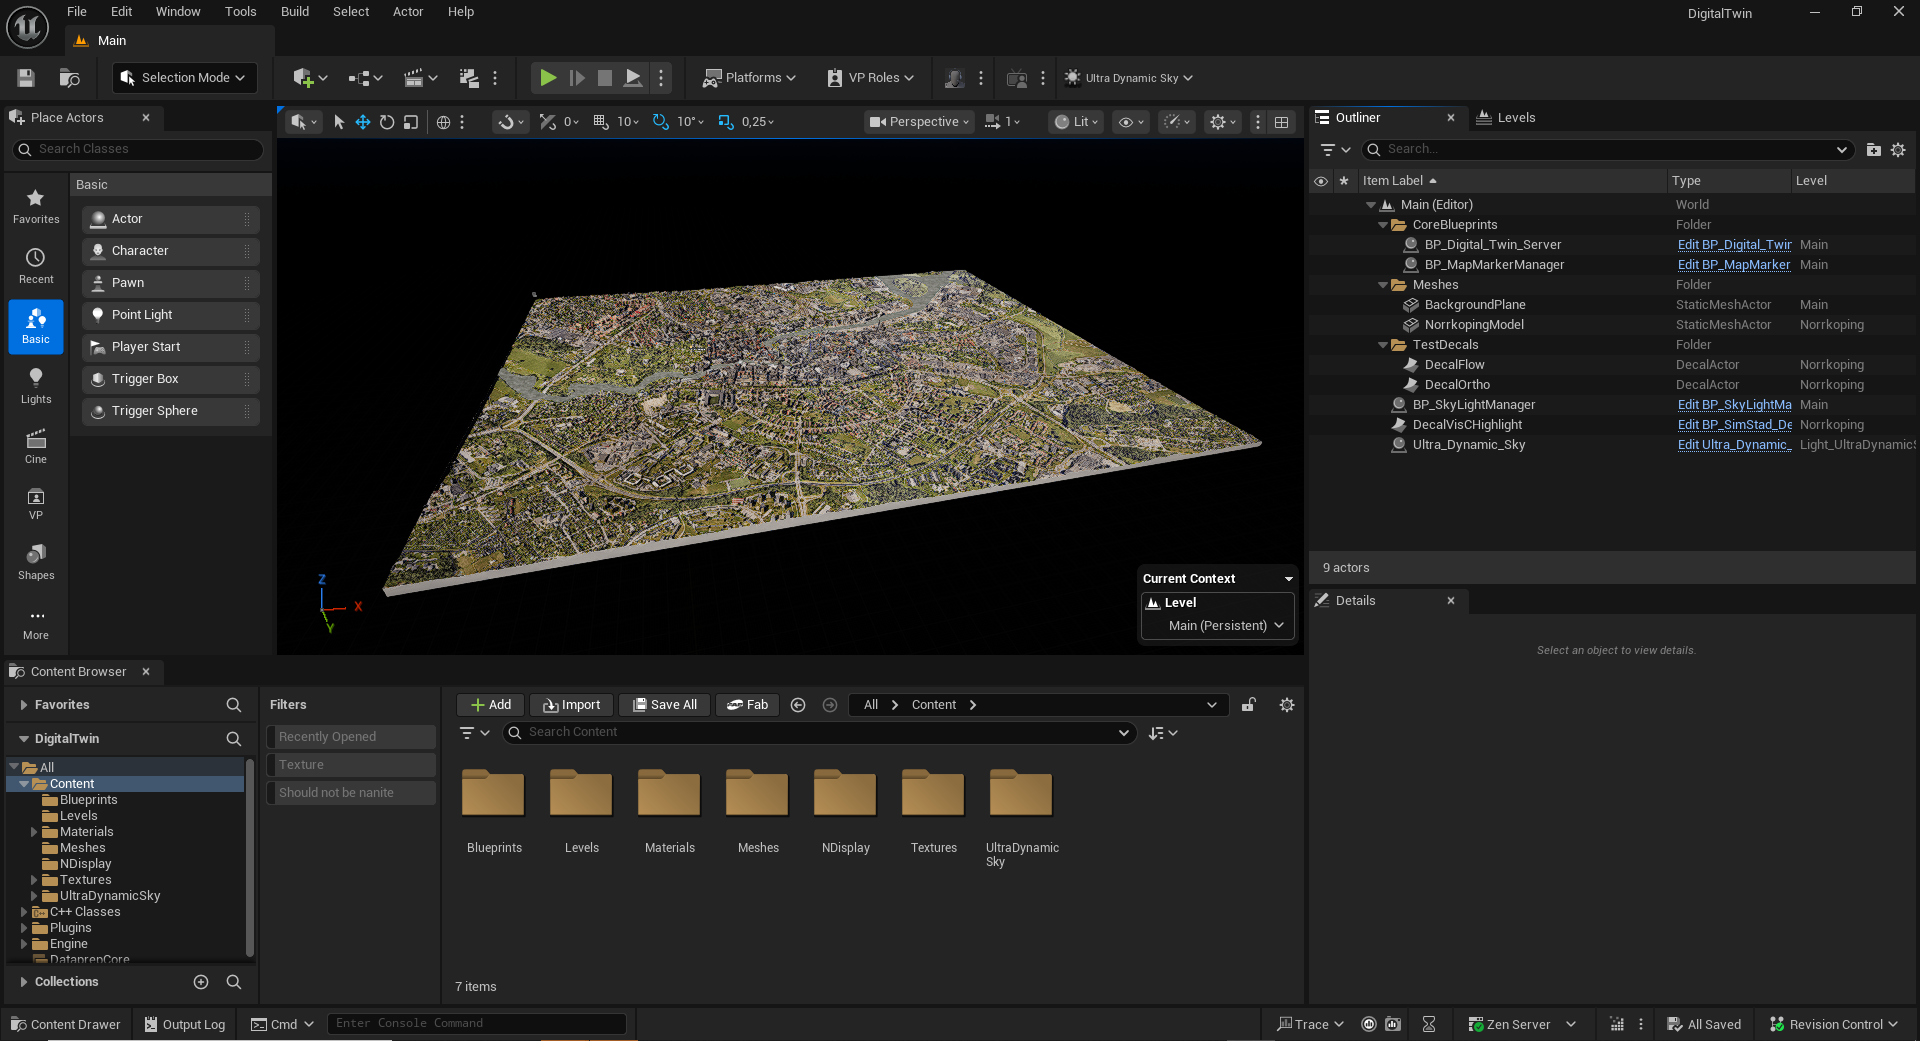
Unreal Engine
The Unreal Engine application is currently using UE5.6, and is a C++ project.
It is primarly using custom code, as well as some plugins.
The project consists of a 3D model of a city, that data is projected on using a decal method.
The program only uses one level in which the 3D model resides, and is loading the datasets which primarily consist of png images on program startup.
Dependencies
NDI
We are using a framework called NDI to stream webpages and other sources as a layer. This uses proprietary code and can therefore not be distributed by our project. The plugin for Unreal Engine is free though and you just need to download it as your own legal entity. Follow this link, and make sure that the project has access to the files .
This allows you to create scripts externally that publish NDI streams to the network, which UE can then listen to. For example, a headless Chrome page that shows live traffic. All you need on the UE side is to provide the stream name. You can also provide a computer name, otherwise UE assumes that the stream comes from the same computer that runs UE.
Ultra Dynamic Sky
We are using a atmosphere light system called Ultra Dynamic Sky. As this is a piece of purchased content from the Epic Marketplace, we are not allowed to distribute the content freely. If you want you can buy it and add to the folder, and then make sure that the correct light level is used. The plugin provides a more complex and visually pleasing light scenario but is not necessary for the functionality of the project. You can opt out of it by setting up your scene with a free alternative , and make sure that the code is handling the light change request from the web connection.
Building the Unreal Engine project
The Unreal Engine application is a C++ project, and thus need to be built using Visual Studio or a similar tool.
Web communication
The Unreal Engine application is controlled using an external interface, and commands from that interface are handled through the WebSocketSubsystem in C++. By setting your custom token on both sides of the communication, you ensure a safe line between the two without interference from other connections. The token is read from file on startup, and you set it by pasting the UUID into the .env file in the root folder of the project. You also need to add the file to your packaged project folder.
Once a connection is established, UE can start receiving messages from the interface. The messages should be in the formats defined in the protocol, and the json string is then parsed into struct formats defined in RequestResponse.h. Some messages, such as PingRequest, is handled directly in C++ and send a response back to the interface. Others are handled by broadcasting the request, which is then handled in Blueprint.
On the Blueprint side, requests are handled by BP_Digital_Twin_Server, which listens to the broadcasts from WebSocketSubsystem and handles the data in the “Handle “ functions, such as Handle Layers Request
Loading datasets
Since the datasets are often high resolution, the time to load a dataset from disk can be quite high. To smooth out the user experience the datasets are loaded into memory on startup, and can then be shown as decals on demand.
The datasets are loaded from a folder named Datasets. The folder has to be located in the root folder of either the Unreal Engine project, or the packaged version of the application under /DigitalTwin. The system also supports subfolders so you can organize your data. Folder redirectors also works, so you can have another folder location on your computer that you are referencing, for example a Google Drive synced folder.
Protocol requests
By sending messages from the web protocol you can make several requests to the Unreal Engine application. The most common ones would be updates to the sun position and layer requests. Please refer to the documentation for the message syntax.
Layers
When you request layers, they are sorted in the order of the array you are sending, with the first index at the bottom. You can also define if the request should replace the old layers or update the parameters of them. Note that it is more efficient to alter parameters of a layer than to completely remove it and replace it with a new version, since the loading of new layer materials is more demanding than just updating a material.
Light
The day/night light of the level can be controlled by setting the day, month and time of day. This changes the settings of the current light system, in our case this is the UltraDynamicSky plugin, but any system for lights work as long as you can convert the time to an angle of the directional light.
Recache
This allows you to reload folders of datasets with recently added files, without having to restart the entire application. The call takes the folder name as an input, and loads any files from that specific folder, replacing the ones already loaded into memory. Note that files are not removed from memory if they are missing, such a change requires a restart.
Map marker
Spawns a special marker decal at the given location, or updates an existing one. The map marker is also a decal like a layer, but have some special functionalities such as movement smoothing. The map marker is handled by the MapMarkerManager, and allows for multiple markers at once, for example for multiple finger indices. Make sure that the MapMarkerManager is placed in one corner of the 3D model and the vector is placed in the other corner.
Traffic
Enables the traffic system, which listens via ZeroMQ for our custom python traffic server and spawns spheres representing the traffic data in Norrköping. This solution is hard coded for Norrköping and will probably change in the future.
Datasets and Decals
The 2D datasets are projected on the 3D model using decals. The 2D png images are used as texture input base for decal materials, with parameter inputs that customizes the behavior of the decal.
Multiple decals can be shown at the same time, allowing layers of data to be combined, either by setting the transparency of each layer, alpha masking or cropping each layer either with min/max UV values or with a circle crop
Decal datatypes
The decal system allows for multiple different media types to be shown on the model
Images
The most common type of data you want to show are static image layers. By default the system is expecting a 4/3 ratio on the images, and any other ratio will result in stretching. The image layer can be cropped given a min/max value for the U and V of the image, or by defining a circle position with radius. The image can also use an unlit mode, where the day/night cycle doesnt effect the color of the image
Color
A color layer is defined by a hex string value instead of an image, but behaves like the image layer in any other sense.
Movie
MP4 files can be loaded as a media texture and played as an animated decal. The media is loaded into memory on startup and is set to loop. The playback control is not very responsive at the moment, so it is better to have the files loop and then you enter at the current point in the video (Changing to the Electra Media Player in the future will hopefully change this).
Flow map
A flow map can animate a texture smoothly by providing a vector field texture, basically a two channel normal map that indicates the direction of the flow. A typical use case would be a river flowing through the city, but can also be used for more niche cases such as traffic flow. You provide a base texture, e g a water texture, as well as a flow map texture in the request.
City 3D model
The model of the city is placed directly in the level . The actual size of the model is not that important, if it matches the size of the decals and the relative location to the projector camera.
Note that some things might be affected by the physical size of the model, such as the light resolution depending on what type of lighting model you are using. It does not seem to matter if you are using ray tracing however.